
7 Common Digitizing Mistakes That Cost You Money
Why Your Embroidery Looks Bad (And Exactly How to Fix It)There is nothing worse than running a 10,000-stitch design only to realize the text is illegible, the circle is an oval, and your machine keeps shredding thread. Bad digitizing isn’t just about aesthetics; it’s about profit. Every thread break costs you 2 minutes of production time. Every ruined garment comes out of your pocket.
Digitizing isn’t just “tracing” art. It’s engineering. Here are the 7 most expensive errors we fix every day-and the physics behind why they happen.
Ignoring Pull Compensation
The Physics: Thread has tension. When you stitch a vertical column, the thread pulls the fabric inward (making it narrower). If you digitize a perfect circle on your screen, it will stitch out as a skinny oval.
Most beginners trust their eyes on the monitor. Do not trust the monitor. The screen shows a “perfect world,” but embroidery happens in the real world where fabric stretches, pulls, and distorts under the needle.
We deliberately distort the design (making columns wider) so that when the fabric pulls, it stitches perfectly. Learn more in our Pull Comp Guide.

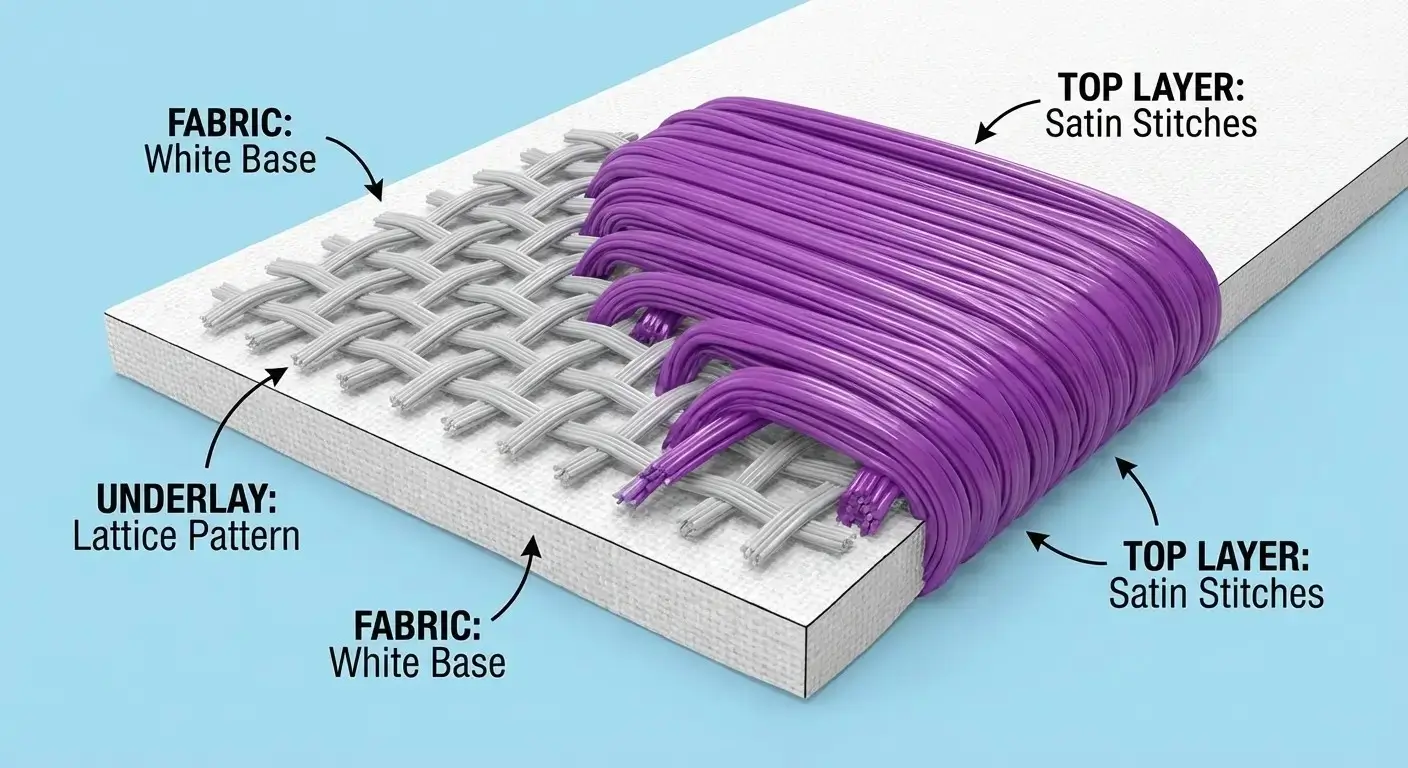
Improper Underlay
The Foundation: Underlay is the stitching that happens before the visible top satin. It stabilizes the fabric to the backing and creates a smooth surface.
The Error: Using auto-digitizing often applies generic underlay. If it’s too light, the design sinks into the fabric (especially on fleece/towels). If it’s too heavy, the design becomes “bulletproof” and stiff.
Use Edge Run to define the shape and Tatami to mat down the nap of the fabric. Read the Underlay Guide.
Small Text “Blobbing”
The Limitation: Thread has physical thickness (usually 0.4mm). You cannot stitch infinite detail. Letters under 5mm are the ultimate test.
The Error: If you use standard settings, the holes in “e”, “a”, and “o” will close up completely. Auto-digitizers fail here 100% of the time, creating illegible blobs instead of crisp text.
We use Center Run stitches and manually open up the spacing between letters to force legibility. See our Small Text Secrets.

Wrong Stitch Density
The Myth: “More stitches = Better quality.”
The Reality: Too many stitches in one spot causes “Puckering” (where the fabric wrinkles around the logo) and breaks needles. It creates a hard, uncomfortable patch on the shirt that customers hate wearing.
Standard density is around 0.40mm. We lighten this for sensitive fabrics (like performance wear) to prevent holes. Full Density Guide.

The “Hidden” Efficiency Mistakes
These errors don’t just look bad-they slow down your production.05. Too Many Trims
Every time your machine trims a thread, it stops for 6-10 seconds. Auto-digitizing cuts the thread constantly. If a design has 50 unnecessary trims, that adds 8+ minutes to every run. Over 100 shirts, that is 13 hours of wasted time.
Fix: Continuous Pathing06. Missing Lock Stitches
If the design doesn’t “tie in” and “tie off,” stitches unravel in the wash. This causes huge customer returns. Every jump and end point needs a secure lock stitch to ensure durability.
Fix: Always Lock Start/End07. Sharp Satin Angles
Stitches shouldn’t turn 90° instantly. It creates “whiskering” (gaps) on the outer edge. The needle needs to fan out gradually to maintain coverage around curves without bunching up on the inside.
Fix: Smooth Turning AnglesStop Fixing Files. Start Printing.
Your time is worth more than troubleshooting stitch angles. Send us your artwork, and get a flawless, production-ready file in 4-6 hours.
Get a Professional Quote ($15)